LBZ Fan Clutch

johnmyster

Member
Nov 6, 2023
68
25
18
Lynchburg, Virginia
Well, I just finished installing a new rear fan shroud and a 2886 clutch. I can see why the shrouds get discarded. Greatly reduced access to...everything going forward. It looks like I need to add ratcheting box end wrenches to my collection.

Question, the rubber surround fingers. Should the rubber fingers be tucked inside of the upper and lower shroud, or should they be folded back to create a modest seal under vacuum?
 
Last edited:
  • Like
Reactions: malibu795

malibu795

misspeelleerr
Apr 28, 2007
8,298
610
113
42
in the buckeye state
Fan clutch is a wear item. Since 75% of us rarely use the truck at full capacity it's easy for it to go unnoticed as it wears out.. usually AC at idle is first to suffer on hot humid days. Which generally means radiator needs cleaned or clutch needs replaced.

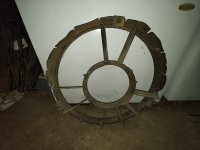
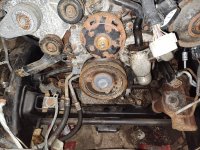
Fan shroud is a PITA, I cut the following support out and spray paint the top hole for easy of install and removal.
Installed definitely helps AC in summer when it's hot and humid out especially noticable at idle

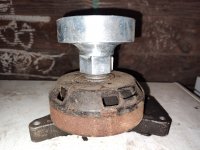
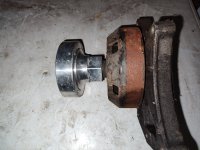
2886 is Hayden's replace for the Kodiak OEM fan clutch. Which is more aggressive than the pickup version. It's sensitive enough that you can kick the fan on while turning the AC on at idle in 80°
It's doesn't mover the fan close but does have longer fins to sense heat temp change

The solid hub was a R&D thing and kinda chasing last 10% of what ever I could get.. DHD has one now. I wouldn't recommend it unless you towing heavy or high sail/wind drag loads 99% of the time.
it really wasn't much louder then having a clutch. With window down and 4" straight pipe RCLB dually.
Source: https://youtu.be/xoY3WxQoi6E?feature=shared


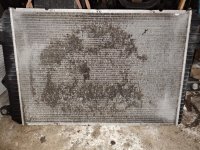
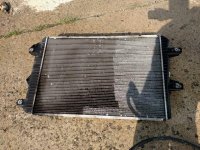
This is the radiator out of the 09 I picked up last year then wrecked 2 months later.. 90% of stuff passes throttle trans cooler AC condenser and intercooler then get trapped in the radiator. Definitely should get it cleaned. You can pressure wash it out, use a 15° fan tip. The cross tubes won't care.. the fins however you need to run the fan blade the same direction as the fins.
Example radiator standing like it's installed, fins are vertical tubes are horizontal.
Run the tip vertical and walk left to right, you can get up close like 1" off and not hurt it..
Keep the wand horizontally 90° to the radiator so you don't shove the fins over.. there is some forgiveness not much.
Just go slow tank your time.. pending how dirty it is might have to flip it over spray the other direction then back over spray it again a couple times
Can soak it with condenser coil foaming cleaner to help break stuff up, works good on light stuff, if it's packed hard it won't do much.

Hope this helps
 

Attachments

  • IMG_20240413_183004036.jpg
    IMG_20240413_183004036.jpg
    175.7 KB · Views: 12
  • IMG_20240413_183434508.jpg
    IMG_20240413_183434508.jpg
    638.5 KB · Views: 11
  • IMG_20240413_184821491.jpg
    IMG_20240413_184821491.jpg
    309.9 KB · Views: 11
  • IMG_20240413_184812105.jpg
    IMG_20240413_184812105.jpg
    313.4 KB · Views: 11
  • FB_IMG_1713049162281.jpg
    FB_IMG_1713049162281.jpg
    142.4 KB · Views: 14
Last edited:

malibu795

misspeelleerr
Apr 28, 2007
8,298
610
113
42
in the buckeye state
Well, I ordered a new rear fan shroud and a 2886 clutch and just finished installing. I can see why the shrouds get discarded. Greatly reduced access to...everything going forward. It looks like I need to add ratcheting box end wrenches to my collection.

Question, the rubber surround fingers. Should the rubber fingers be tucked inside of the upper and lower shroud, or should they be folded back to create a modest seal under vacuum?
Rubber Should be folded back, that allow the wind to be shoved passed it while going down the road, and it will seal when the fan is engaged. If not laid that way the fan will suck air around the shroud and you will loose decent amount of efficiency, as fluids/gasses/electricity travel path of least resistance

I use stubby 13mm one way ratchet wrench straight not angled, box wrench for lower two OEM bolts.
I've tried bi-directional wrenches but tend to flip the level to go opposite direction too many times..
If you can get a high tooth count version the better there isn't a lot of swing room.. unless you can fit up underneath which might give you some room with a stubby ratchet and socket pending how big your arms are to snake around the steering linkage. I don't fit lol
 

Attachments

  • IMG_20240413_190831238.jpg
    IMG_20240413_190831238.jpg
    489 KB · Views: 14

johnmyster

Member
Nov 6, 2023
68
25
18
Lynchburg, Virginia
Thank you for your take on the shroud flaps. Keeping the flaps folded back during install was a challenge, but logic said that would be the more functional arrangement.

My radiator is clean, externally at least. I would have a hard time cutting fins out of a shroud that I just paid money for. That said, I will seriously consider cutting the lower mounting holes into slots, so I don't have to align and run the bolts their full length.
 
  • Like
Reactions: malibu795

malibu795

misspeelleerr
Apr 28, 2007
8,298
610
113
42
in the buckeye state
Thank you for your take on the shroud flaps. Keeping the flaps folded back during install was a challenge, but logic said that would be the more functional arrangement.

My radiator is clean, externally at least. I would have a hard time cutting fins out of a shroud that I just paid money for. That said, I will seriously consider cutting the lower mounting holes into slots, so I don't have to align and run the bolts their full length.
Fresh wagon wheel putter seal is a bear for sure.
Now that you mention it, I'll probably slot mine on re-assembly.
Definitely understand the sentiment on not cutting a new piece, it helps greatly with removal and installation of the fan clutch assembly, I'd wear my clutch out yearly, basically every 100-120k miles, generally put new clutch on in the spring.
Not saying you have follow what I did, the cost of the fan clutch increased my productivity (didn't have to slow down as much for wind or hills which made me faster) and usually saved me 3-4k in fuel cost at the end of the year.
 

johnmyster

Member
Nov 6, 2023
68
25
18
Lynchburg, Virginia
My hands are still healing. FYI, if you order a brand new GM wagon wheel, the spokes are razor blades on all the edges. If I ever have it out again, I will go over it with sandpaper. I'll also slot the lower two mounting holes. I might even consider loctite to hold the bolts in place, slightly loose (like studs) and then just use the upper bolt to lock the shroud in place.

I've ordered ratcheting flex head wrenches. I may end up ordering stubbies too. This truck is going to cause my minimalist toolbox to grow. But how much of it do I wind up carrying with with me in the truck...

Does your fan pulley have notches on the front cover? (Mine does not.) Are they useful for holding it during clutch removal?

It looks like you work in far dustier (and rustier) conditions that my truck. I can see how frequent stack cleaning could be necessary.
 

malibu795

misspeelleerr
Apr 28, 2007
8,298
610
113
42
in the buckeye state
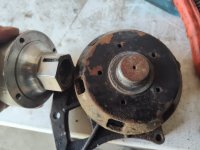
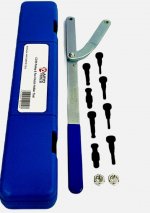
Fan pulley does have notches for the tool.. and there is a specialty tool kit for it..

I've used 18" pipe wrench and a 4# hammer to break it loose.. later I used a 3/4" steel chisel that was ~18" long and a 4# hammer.
Threads are L/H or reverse. As the engine spins the threads titghten
 
  • Like
Reactions: N2BRK

2004LB7

Super Moderator
Staff member
Dec 15, 2010
7,108
2,215
113
Norcal
I made a tool out of two pieces of flat bar and some pins to hold the fan pulley. Was much easier then chiseling it or banging on it with a hammer.

Not too much different then this one. But instead of hooks I added pins to fit into the holes in the pulley
s-l1200.webp
 
  • Like
Reactions: malibu795

johnmyster

Member
Nov 6, 2023
68
25
18
Lynchburg, Virginia
I made a tool out of two pieces of flat bar and some pins to hold the fan pulley. Was much easier then chiseling it or banging on it with a hammer.

Not too much different then this one. But instead of hooks I added pins to fit into the holes in the pulley
s-l1200.webp
I borrowed a tool similar to that from the parts store, along with the required 48mm clutch wrench. I just stuck two short bolts into the pin holes and grabbed those with the hooks. I couldn't pull hard enough on my improvised pins to get anywhere, but I was able to brace it against the AC compressor and use a hammer on the 48mm clutch wrench to get enough impact to jostle it free. That is, after some heat and PB blaster.

I'm hoping I put it on with enough grease on the threads to make future removals easier.

All that said, the giant slots in Malibu's pulley intrigued me.
 

2004LB7

Super Moderator
Staff member
Dec 15, 2010
7,108
2,215
113
Norcal
I borrowed a tool similar to that from the parts store, along with the required 48mm clutch wrench. I just stuck two short bolts into the pin holes and grabbed those with the hooks. I couldn't pull hard enough on my improvised pins to get anywhere, but I was able to brace it against the AC compressor and use a hammer on the 48mm clutch wrench to get enough impact to jostle it free. That is, after some heat and PB blaster.

I'm hoping I put it on with enough grease on the threads to make future removals easier.

All that said, the giant slots in Malibu's pulley intrigued me.
I put mine back on with Anti-seize. I had to remove it again a year or two later and it came off easy. The engine turns in the direction that tightens it so I didn't worry about it coming loose
 

malibu795

misspeelleerr
Apr 28, 2007
8,298
610
113
42
in the buckeye state
I borrowed a tool similar to that from the parts store, along with the required 48mm clutch wrench. I just stuck two short bolts into the pin holes and grabbed those with the hooks. I couldn't pull hard enough on my improvised pins to get anywhere, but I was able to brace it against the AC compressor and use a hammer on the 48mm clutch wrench to get enough impact to jostle it free. That is, after some heat and PB blaster.

I'm hoping I put it on with enough grease on the threads to make future removals easier.

All that said, the giant slots in Malibu's pulley intrigued me.
The 2 of the 5 holes is what the tool grabs to hole the idler puller and you can see where I too a chisel to the fan hub
IMG_20240417_184413558.jpg
 

PureHybrid

Isuzu Shakes IT
Feb 15, 2012
3,517
501
113
Central OH
I just use a hub wrench that has a cup to sit an air hammer or punch into, doesn't ruin the nut that way. Never had any trouble getting one loose, I always leave the belt on to hold the pulley
 

1FastBrick

Well-known member
Dec 1, 2016
2,603
1,117
113
Junkyard
I made a tool out of two pieces of flat bar and some pins to hold the fan pulley. Was much easier then chiseling it or banging on it with a hammer.

Not too much different then this one. But instead of hooks I added pins to fit into the holes in the pulley
s-l1200.webp
like this tool?
universal fan clutch tool.jpg
 

darkness

Well-known member
Jul 15, 2009
1,327
388
83
48
vegas
I’m an air hammer with a blunt end kind of guy. This fan clutch in the Kodiak is pissing me off. Noisy as all hell driving around town. I need a free weekend to pull the trailer with the mods I’ve done. I still need to put the external trans cooler on. Not all kodiaks came with one. And none of them came with fuel coolers.
 

2004LB7

Super Moderator
Staff member
Dec 15, 2010
7,108
2,215
113
Norcal
Very similar. The attachment point or that little pivot I put right near the top so it was taller and can open up more. Same idea though.

I welded in the pins too. Very basic easy to make tool.

The chisel and air hammer was messing up the nut pretty bad. The fan pulley was also just slipping on the belt. The tool and a wrench and it popped off with little effort
 

DAVe3283

Heavy & Slow
Sep 3, 2009
3,729
297
83
Boise, ID, USA
My hands are still healing. FYI, if you order a brand new GM wagon wheel, the spokes are razor blades on all the edges. If I ever have it out again, I will go over it with sandpaper.
Indeed, the LBZ fans are stupid sharp on the mold/flashing lines. What I found is a deburring tool makes quick work of it, much easier/faster than sandpaper. Well worth the couple minutes it will take to not slice your hands to ribbons every time you get near the stupid thing.