LB7 Blown head gasket and/or injector cups Part 2 after closed thread!~
- Thread starter fishv12
- Start date
You are using an out of date browser. It may not display this or other websites correctly.
You should upgrade or use an alternative browser.
You should upgrade or use an alternative browser.
i usually start torque around 40 lb ft go in sequence, then 85 lb ft, and then finish at 125 lb ft.(Should note that I do each torque sequence until they no longer move, before moving to the next torque setting.)
This is confusing because I read to tight them all down to 125 first shot in sequence. Then back first one to 40-50ftlbs and then tight it back down to 125 and continue in sequence. Repeat 3 times that same process.
Reading the ARP instructions word for word indicates to tight them down to 125 in 3 equal steps so 40 - 85 - 125 is what you just mentionned. It also makes more sense to me as you are pushing the head gasket down a little more equally instead of tighting the first bolt right down to 125....
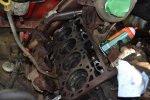
As far as cleaning the block which is what I am doing now I masked the cylinders and stuffed rags in the pushrod openings and started scraping avoiding dropping stuff into any holes. Impossible to mask all the small passages. Coming along real slow... My neck has been hurting from the accident so I can only work on my better days. I can't wait to have her back together tho!
Reading the ARP instructions word for word indicates to tight them down to 125 in 3 equal steps so 40 - 85 - 125 is what you just mentionned. It also makes more sense to me as you are pushing the head gasket down a little more equally instead of tighting the first bolt right down to 125....
As far as cleaning the block which is what I am doing now I masked the cylinders and stuffed rags in the pushrod openings and started scraping avoiding dropping stuff into any holes. Impossible to mask all the small passages. Coming along real slow... My neck has been hurting from the accident so I can only work on my better days. I can't wait to have her back together tho!
Last edited:
After speaking with my friend Henry from COTNP he answered my question about torquing the head studs. I just want to write this down so it can help any other ppl reading this as well.
He suggests to first tight them up in sequence to 40, then again in sequence to 85 and then again in sequence to 125. Once done back them ALL up to ~60 and then again in sequence to 125. Repeating this process 3 times total.
He suggests to first tight them up in sequence to 40, then again in sequence to 85 and then again in sequence to 125. Once done back them ALL up to ~60 and then again in sequence to 125. Repeating this process 3 times total.
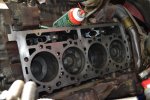
Hey guys I would like your opinions on cleaning the block. Right now I am following GM specs which is wet sanding at 600grit. So far this has been a long process although it does work. What do you guys recommend. Doing a search on the very same forum I found some ppl using scotch brite pads on a rotary tool but I would like to hear what you have to say about it.
Well I took some pictures of my sanding job. All is extremely smooth and I am only left with stains which simply won't go.
Attachments
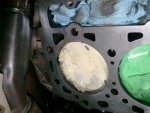
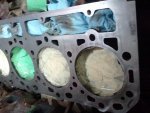

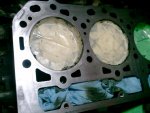
Just a little progress report. I sanded my driver side much of the same way. The driver side was much worse but ended nice just like the passenger side. I tried using a straight edge and a .002 gauge and I couldn't get it to go under whatsoever so i will take it that my deck is nice and true. Chased all the threads. Next step cleaning and then I will be ready to put those head gaskets on 
Good day guys
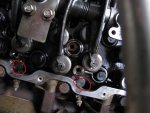
I think I ran into a little bit of a pickle. I lost a little pin which the injector holder sits on. It's just a little black pin which allows the injector holder to sit flat on it. I will take a pic of it but I can't find any info online about it. I sure hope I can just get that little part at the GM dealership. I think it was lost while my heads where in the shop. He had bagged 7 of them in a zip lock and at first I just thought these were not from my heads but I just figured out today where they are supposed to go. Help!
I think I ran into a little bit of a pickle. I lost a little pin which the injector holder sits on. It's just a little black pin which allows the injector holder to sit flat on it. I will take a pic of it but I can't find any info online about it. I sure hope I can just get that little part at the GM dealership. I think it was lost while my heads where in the shop. He had bagged 7 of them in a zip lock and at first I just thought these were not from my heads but I just figured out today where they are supposed to go. Help!
Youpi! I just pm'd him but now I found them on his website. Makes me feel a little better to see I can order these little guys individually. Now I know Henry could get them for me but if I can get a part number it will be much faster for me to just get one from my local stealership.
Hey Simon as you saw the part on the site the part number is there also if you missed it here it is Item 97190517. If they do not have them let me know ill just mail one out to you.
Thanks Henry! I will call around tomorrow and find out and I will let you know. I really appreciate everything
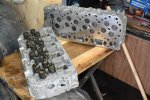
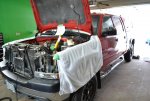
Just an update the heads are in. Studs are torqued and my arms are spaghetti. You have to eat your wheaties! Injectors are going in tomorrow minus the one I can't install obviously. I really hope to get them as I am hoping to get ahead a little this weekend.
Just an update the heads are in. Studs are torqued and my arms are spaghetti. You have to eat your wheaties! Injectors are going in tomorrow minus the one I can't install obviously. I really hope to get them as I am hoping to get ahead a little this weekend.
Thanks Henry! I will call around tomorrow and find out and I will let you know. I really appreciate everything
Just an update the heads are in. Studs are torqued and my arms are spaghetti. You have to eat your wheaties! Injectors are going in tomorrow minus the one I can't install obviously. I really hope to get them as I am hoping to get ahead a little this weekend.
Did you do the three retorques on the studs?