Injector install soon what else should I do
- Thread starter chowpay
- Start date
You are using an out of date browser. It may not display this or other websites correctly.
You should upgrade or use an alternative browser.
You should upgrade or use an alternative browser.
chowpay what state do you live in , is the truck a daily driver , Im asking to find out whether the truck is going to be used regularly in sub O weather !
chowpay what state do you live in , is the truck a daily driver , Im asking to find out whether the truck is going to be used regularly in sub O weather !
CA, its warm here and its less of a daily just need something to pull or haul on trips
This has to be the longest injector thread Ive ever seen....:rofl:
I know.. im just so slow, the only time I have is on the weekends and usually a just one day on the weekends.. and its my first time doing this so trying to get all the tools and do things correctly is challenging. But so far so good =D
BUT progress slow and steady..
Got the covers and the injectors off. I used everyones advise and bought a pry bar put it against the rail and it too so little effort I was amazed.

Took someone elses advise on youtube and glued a torx on the end of a 1/4 ratchet. This gave me just enough space to get to the furthest bolt on the lower valve cover next to the driver side firewall:

Each injector I pulled out was nastier than the last:


So turns out some of the injectors are stupid stuck. Here's a bent injector tool:

Since I didnt want to break the tool, still good for any not-so-stuck injector, got this other tip on youtube and it worked so well. Take the end of an air hammer bit and stick it in the hold down, grab your 3lb hammer and give it a tap. It'll pop right out:

Doing the general things while im in here, I looked up how to clean a ERG cooler. Boy did it work. If anyone else is doing this , get your self small tub and a gallon of purple cleaner and just leave it there overnight, worked so good I put the valve covers in a tub and I'll get to it next weekend:
Before:

After:


Questions for ya'll
1. What is this and where do I get a cap for it :

One of the cups came out with the injector.
2. How do i get this cup off the injector its stuck pretty good:

3. Do you guys recommend I work on pulling all the other cups out too, I got a blind puller and a mac tools p99 steering wheel puller kit, I read that combined I should be able to use pieces of each to make something that will pull them out. Just want to see if this is necessary or recommend?
.. now just waiting on my new injector lines to arrive before I can start putting things back together
X2 on pulling all cups. You don't want one lifting and have to do this all over again. The 1/2" anchor bolt works good. Plus let that loctite set 24hrs before starting or adding coolant.
weld'n water pumps and stuffs
Yes its taking forever (had to move my ex-gf out of my house and finish building this for a client). So back to being single and finally getting shit done
.. no I'm not done.. But working a little every night has been helping .
So far completed these:
1- injectors installed (replaced all the related hardware for covers too)
2- took everyones advise and reinstalled all the cups/seals << buy the damn tool. Don't mess with the anchor bs. this cost me at least a night or two dicking with the anchors. New tool cost 90 bucks and did all the cups in 5mins.
3- New HP fuel lines + New hardware
4- New Water pump + New Housing
5- New Thermostats
6- 2 New idler pulleys
Once the valve covers and HP Lines were installed I switched focus to the water pump.
This was not as bad as I thought it would be you just really need a long f'n cheater bar.
While searching around on forms I noticed that people are buying welded version of the water pump. I read up on it and it sounded like a good idea.
So I TIG'd mine too, couldn't find pics of anyone doing this and didn't want to return the one I bought and pay 2x as much for a new one that had a couple of beads on it. Hopefully this helps anyone wondering how to do it. This works for me:

The pump itself actually looks pretty good before I cleaned it. The pump housing had a little bit of erosion but nothing too bad that it needs to be replaced. But I don't want to deal with it and replaced it anyways.

I know that the shaft has some seals in there that are heat sensitive. From what I read its ok up to 250-280 deg. So I put the whole setup into a water bath and watched and welded little at a time, using a wet towel to really suck up the heat even more:

On the weld and the shaft itself about 1sec after the weld is complete. Never even got close to 200:

Did the same for the prop side:

- Where I'm stuck now is here:

- Where does this ball of crap mount to.. its the one pre-install picture I forgot to take

Couldn't find it in any diagram on line. Partially because I'm not sure what this is called. I KNOW it goes in the back somewhere as it has the pig tail for the rear injector wiring plug.
- Also when pulling off the 1-bolt pipe onto of the thermostat housing, I noticed besides the O-ring that there is RTV on it. But I couldn't find any instructions about re-installation including the RTV. what do you guys do?
Keep in mind this is a Cali truck
Yes its taking forever (had to move my ex-gf out of my house and finish building this for a client). So back to being single and finally getting shit done
.. no I'm not done.. But working a little every night has been helping .
So far completed these:
1- injectors installed (replaced all the related hardware for covers too)
2- took everyones advise and reinstalled all the cups/seals << buy the damn tool. Don't mess with the anchor bs. this cost me at least a night or two dicking with the anchors. New tool cost 90 bucks and did all the cups in 5mins.
3- New HP fuel lines + New hardware
4- New Water pump + New Housing
5- New Thermostats
6- 2 New idler pulleys
Once the valve covers and HP Lines were installed I switched focus to the water pump.
This was not as bad as I thought it would be you just really need a long f'n cheater bar.
While searching around on forms I noticed that people are buying welded version of the water pump. I read up on it and it sounded like a good idea.
So I TIG'd mine too, couldn't find pics of anyone doing this and didn't want to return the one I bought and pay 2x as much for a new one that had a couple of beads on it. Hopefully this helps anyone wondering how to do it. This works for me:
The pump itself actually looks pretty good before I cleaned it. The pump housing had a little bit of erosion but nothing too bad that it needs to be replaced. But I don't want to deal with it and replaced it anyways.
I know that the shaft has some seals in there that are heat sensitive. From what I read its ok up to 250-280 deg. So I put the whole setup into a water bath and watched and welded little at a time, using a wet towel to really suck up the heat even more:
On the weld and the shaft itself about 1sec after the weld is complete. Never even got close to 200:
Did the same for the prop side:
Questions:
- Where I'm stuck now is here:
- Where does this ball of crap mount to.. its the one pre-install picture I forgot to take
Couldn't find it in any diagram on line. Partially because I'm not sure what this is called. I KNOW it goes in the back somewhere as it has the pig tail for the rear injector wiring plug.
- Also when pulling off the 1-bolt pipe onto of the thermostat housing, I noticed besides the O-ring that there is RTV on it. But I couldn't find any instructions about re-installation including the RTV. what do you guys do?
Keep in mind this is a Cali truck
Last edited:
All that crap with the solenoids and little tubing is for the EGR and vacuum pump. It mounts over the valve cover back by the firewall
Attachments
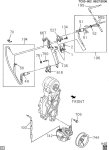

All that crap with the solenoids and little tubing is for the EGR and vacuum pump. It mounts over the valve cover back by the firewall
Thanks, I'll find where this bastard goes tonight.
As for the thermostat cover pipe. Do you guys put RTV on top of that oring?

Whats wrong with the gasket?
I think this is the one
https://shop.advanceautoparts.com/p...VylqGCh0RJw65EAQYCSABEgI8pPD_BwE&gclsrc=aw.ds
I think this is the one
https://shop.advanceautoparts.com/p...VylqGCh0RJw65EAQYCSABEgI8pPD_BwE&gclsrc=aw.ds
Whats wrong with the gasket?
I think this is the one
https://shop.advanceautoparts.com/p...VylqGCh0RJw65EAQYCSABEgI8pPD_BwE&gclsrc=aw.ds
Oh nothing was wrong with the old one, but its got the miles so just replacing all the gaskets I take off. Thanks that was the right one, though I ended up getting one from the dealer
Does anyone have a link or know what this stud is called. It bolts to the engine side of the egr valve. Tried to google around for it but got nothing

The one I did pull out

Thanks
Its just the EGR stud. Nothing special. If it is buggered up and you can't find a new on, just put a regular hex bolt on it
When I did mine I had to remove them to get the EGR out of the way. Would have been easier if they where regular bolts instead of the studs