Head gasket build

blueshift

New member
Jan 29, 2024
24
20
3
Raleigh
I'd do every rubber line under the hood (coolant, fuel, and hydraulic) and use spring clamps (like the factory did) except the few places where a worm clamp is appropriate. Even if you don't want to go that far, please do that 3" long coolant hose that runs over/behind the fan pully bracket. The one that returns the turbo coolant back to the bypass tube. The ones in the valley can be tackled later but that one is a tough cookie on its own.

I guarantee the turbo thermostat has enough crud in it that it's stuck open.

Your water pump looks like it might be newer than the truck. Your harnesses also look like they aren't shedding brittle loom like mine were, before I redid everything I could touch.

An updated oil cooler if you have heavy towing aspirations?

Not the OP, but currently in a similar situation, and I agree 100% (especially the bolded).

As I mentioned earlier, I'd already decided to do the soft fuel lines, as they looked pretty bad. Finally swapped them out last night, and WOW, they were awful. I swear I could almost see through the small 5/16" ones on the CP3. I think the inner liner was the only thing still intact. I was going to use the spring clamps, but the replacement hose I got (Shields Rubber 368, USCG approved stuff) was quite a bit stiffer and the spring clamps didn't seem to compress them much, so went with some good quality Ideal worm clamps.

Went ahead and did the coolant lines on the upper half of the motor as well. They didn't look terrible, but again, were quite soft and flexible compared to the new stuff I got. What's $40 more when I'm already $4k+ and 30 hours into it?

Didn't mention it in my post earlier, but I also rebuild the filter head. Again, what's another $20 while it's already off the truck? And based on how square-shaped all the round o-rings were, I couldn't believe it wasn't hemorrhaging fuel everywhere, especially under 7-8 psi from the lift pump.

Funny you mention the harness. Mine was in shambles, and getting worse every time I only looked at it. Almost just said 'eff it', but my OCD got the best of me. Pulled the engine harness off and completely reloomed it. Did the bundle coming out of the fuse box as well. Used the TechFlex F6 split braided. Quite a bit of work (tedious, too), but OMG, may be one of the most satisfying things I've ever done on a truck / car. It looks amazing.

Considered doing the water pump, too, as I know mine is original (260k miles). But it looks like draining the coolant is about the only common step with changing the injectors. Kinda like the OP, I've been piecemealing this project for a couple hours at a time for the last several weeks, and I'm ready to get it finished. So that'll be a job for another day.

Thanks for the advice, and a bit of reassurance that I'm not crazy for adding on all this extra time / money / work to this already big job. Hope the OP feels the same way.
 
  • Like
Reactions: Bdsankey

lb7resto

New member
Jul 19, 2023
28
14
3
NC
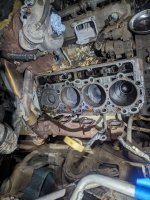
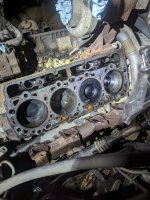
First looks from last night:
PXL_20240313_013634503.MP.jpg
PXL_20240313_020006212.jpg

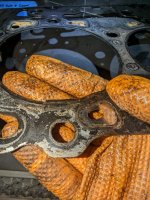
Cylinder 8:
PXL_20240313_020123588.jpg

I didn't take pictures of the heads, but they were about as you'd expect after seeing this. The only thing I really took note of was a little bit of corrosion on most of the valves which would probably clean up fine, maybe leave some pitting behind. After seeing the heads it pushed me over the edge to the fleece heads. I really just hate the idea of messing with the cups and them causing me trouble in the future.

The water jacket in the block looks rough. We'll see how well that cruddy corrosion lying on top of cylinder 7 cleans up, fingers crossed. Other than just being dirty above the rings the cylinders looked good, I saw some vertical lines in #5 but it didn't look too bad, I'll get in there and see what that's about later.
 

lb7resto

New member
Jul 19, 2023
28
14
3
NC
My wire looms at the driver's fender are absolutely crumbled to dust. I do want to get some OE loom and fix the few spots where it's gone.

I do appreciate the notes about the coolant lines. I probably would have re-used everything that wasn't busted but I will replace them all. Rebuilding the filter head seems like a good idea too. I want to avoid the water pump for now, already enough scope creep happening here - I need to get this thing going.
 

TheBac

Why do I keep doing this?
Staff member
Apr 19, 2008
15,611
1,868
113
Mid Michigan
You can use a straightedge to check that the block surface is flat. I have an adjustable carpenter square, and used the ruler portion of it.
I then very carefully cleaned the block surface with a piece of emery cloth wrapped around the same ruler.

Rebuild was in 2009, and engine has 70,000 miles since with no sealing issues.
 
  • Like
Reactions: 2004LB7

lb7resto

New member
Jul 19, 2023
28
14
3
NC
To prep the block...
Well I've seen people say sand it and I've seen people say don't even touch it with a scotch brite. Manual says gasket scraper only which is what I'm inclined to.

I'm realizing now that even though I've built a few gassers I've only ever done one strictly head gasket job, and it was a parking lot rescue on a friend's jeep (went into deep water and I dared him so I figured I owed it to him), I don't even recall what I did to prep surfaces... nothing? So every other time I've done this before everything has been fresh machined.
 

2004LB7

Well-known member
Dec 15, 2010
6,982
2,145
113
Norcal
Well I've seen people say sand it and I've seen people say don't even touch it with a scotch brite. Manual says gasket scraper only which is what I'm inclined to.

I'm realizing now that even though I've built a few gassers I've only ever done one strictly head gasket job, and it was a parking lot rescue on a friend's jeep (went into deep water and I dared him so I figured I owed it to him), I don't even recall what I did to prep surfaces... nothing? So every other time I've done this before everything has been fresh machined.
I've had good luck using a flat block of aluminum or steel with a piece of sandpaper stuck to one side. Clean up the whole surface then like Tom mentioned, use a good straight edge and check for flatness. I like to use a flashlight behind the edge and look for light coming through. Sand the high spots until you are flat. Don't forget to stuff rags in the cylinders and clean them up thoroughly. You can tape them off too to keep the grip from getting down between the pistons and cylinder

There is many options and opinions on the subject so don't take it as the only way.
 
  • Like
Reactions: 1FastBrick

PureHybrid

Isuzu Shakes IT
Feb 15, 2012
3,493
474
83
Central OH
Don't use a "Roloc wheel" or scotchbrite disc, I like using the green bristle disks. They're basically plastic fingers. You could use a scotchbrite like the gray ultra fine, but I'd do it by hand. Honestly unless there's some crud that a general wiping won't remove, just use a lint free rag and hit it with some alcohol
 

lb7resto

New member
Jul 19, 2023
28
14
3
NC
After working it a little I'm finding there to be some pretty tough corrosion right where the fire ring sits, it will only come off with a metal scraper and then isn't smooth. I think I'm going to have to use sandpaper.

Really what brought me in here today was to ask if I should get the PPE cast iron cupless heads instead of the fleece aluminum for this.

Also as I'm getting my shopping cart together I wanted to ask about dmaxstore in general and if their injector pressure lines were good or if I should stick with GM.
 

N2BRK

Well-known member
Dec 31, 2009
2,054
371
83
After working it a little I'm finding there to be some pretty tough corrosion right where the fire ring sits, it will only come off with a metal scraper and then isn't smooth. I think I'm going to have to use sandpaper.

Really what brought me in here today was to ask if I should get the PPE cast iron cupless heads instead of the fleece aluminum for this.

Also as I'm getting my shopping cart together I wanted to ask about dmaxstore in general and if their injector pressure lines were good or if I should stick with GM.
I asked about those heads here not long ago; no love to be found. Fleece all the way, from every reply that I was given in public and in private.
 
  • Like
Reactions: 2004LB7

DAVe3283

Heavy & Slow
Sep 3, 2009
3,727
296
83
Boise, ID, USA
I am running the Fleece heads on my LB7 swapped Suburban, and have no complaints or regrets. Not having to ever worry about or touch injector cups ever again is nice.
 
  • Like
Reactions: Bdsankey

Bdsankey

Vendor
Vendor/Sponsor
Feb 1, 2018
4,165
1,273
113
Larsen, Wisconsin
I am running the Fleece heads on my LB7 swapped Suburban, and have no complaints or regrets. Not having to ever worry about or touch injector cups ever again is nice.
They are our go to if there is a damaged head or a customer doesn't have time to wait for a machine shop.
 

lb7resto

New member
Jul 19, 2023
28
14
3
NC
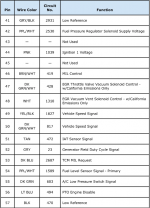
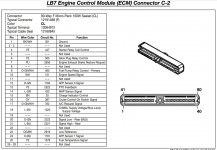
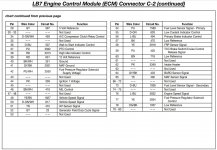
I need to test the connector and wiring for my FPR. Looking at the connector diagrams in ALLDATA, it looks like I need to test the connector to ECM C2 Pins 42 and 77. Can anyone confirm that? It seems straightforward but I feel like I always get automotive electronics wrong and end up chasing the wrong thing.

1713982775518.png
1713982832670.png
 

2004LB7

Well-known member
Dec 15, 2010
6,982
2,145
113
Norcal
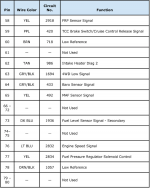
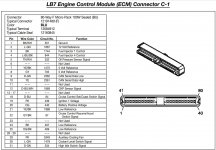
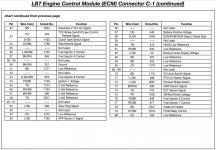
If this is for the 04 in your sig then here is the official GM pinouts. Connector #2 pins 42 & 77 look correct

Screenshot_20240424-114628~01.jpg
Screenshot_20240424-114638~01.jpg
Screenshot_20240424-114651~01.jpg
Screenshot_20240424-114702~01.jpg
 

lb7resto

New member
Jul 19, 2023
28
14
3
NC
Getting close to reassembly...

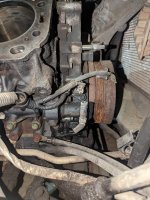
Ideas on the culprit and fix for this oil that's been seeping for a hundred thousand miles at least? I confess I don't understand what component this is down here.1000002830.jpg
 

2004LB7

Well-known member
Dec 15, 2010
6,982
2,145
113
Norcal
PCV dumps down there. Look for leaking, disconnected or clogged pcv hoses

 
Last edited: